dpham00
Modérateur Emeritus
- Location
- Los Angeles, CA
Well, the easy way to remove the headlight switch is well known - With the headlight switch in the "OFF" position, push in on the switch until you feel some resistance, and then, with the switch still pushed in, turn it clockwise, and pull it out. That is the easiest way to do it.
The reason why i decided to put this together was in case you either broke your headlight switch, as seen below, or you wanted to do it an alternative method, which is a little longer, and more involved.

Tools:
-Torx driver with T-20 bit
-A flathead screwdriver
-Pliers (optional)
Alternative Headlight Switch Removal Instructions:
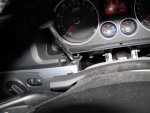
1. Pull the tab shown below outward.

2. Once the tab has been pulled forward, unscrew the screw below. It is a T-20.

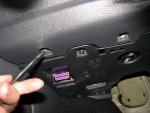
3. Remove the two screws in the pics shown below, also T-20


4. Using a screwdriver, pry the fuse box door outwards, and remove it.

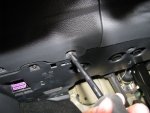
5. Pull the panel outwards at the two tab locations shown below. The two metal clips do not have to be removed. Once the metal clips are free, pull the panel towards the driver's seat. Don't pull too hard, because the connectors are still connected, and will be removed in the next step. Note: If you are having a hard time with the metal clips, then they can be removed with pliers.

6. Disconnect the headlight switch and dimmer switch connectors.

7. Using two screw drivers, push in both black tabs in the pictures shown below at the same time(the tabs should move inward when pushed), meanwhile, pushing the switch ourward. This will free the headlight switch from the panel. I was able to do it myself, but an extra hand would help here.
Note: Do not push on the green thing shown in the picture, as that is the pcb.


The reason why i decided to put this together was in case you either broke your headlight switch, as seen below, or you wanted to do it an alternative method, which is a little longer, and more involved.
Tools:
-Torx driver with T-20 bit
-A flathead screwdriver
-Pliers (optional)
Alternative Headlight Switch Removal Instructions:
1. Pull the tab shown below outward.
2. Once the tab has been pulled forward, unscrew the screw below. It is a T-20.
3. Remove the two screws in the pics shown below, also T-20
4. Using a screwdriver, pry the fuse box door outwards, and remove it.
5. Pull the panel outwards at the two tab locations shown below. The two metal clips do not have to be removed. Once the metal clips are free, pull the panel towards the driver's seat. Don't pull too hard, because the connectors are still connected, and will be removed in the next step. Note: If you are having a hard time with the metal clips, then they can be removed with pliers.
6. Disconnect the headlight switch and dimmer switch connectors.
7. Using two screw drivers, push in both black tabs in the pictures shown below at the same time(the tabs should move inward when pushed), meanwhile, pushing the switch ourward. This will free the headlight switch from the panel. I was able to do it myself, but an extra hand would help here.
Note: Do not push on the green thing shown in the picture, as that is the pcb.
Attachments
-
 hl_switch_removal_alt_1.JPG94.5 KB · Views: 21,901
 -
 hl_switch_removal_alt_2.JPG130.4 KB · Views: 21,544
 -
 hl_switch_removal_alt_3.JPG145.2 KB · Views: 21,613
 -
 hl_switch_removal_alt_4.JPG167.3 KB · Views: 22,392
